Friday, August 17, 2012

WIP: Rhino Interior

(Click for larger images) 


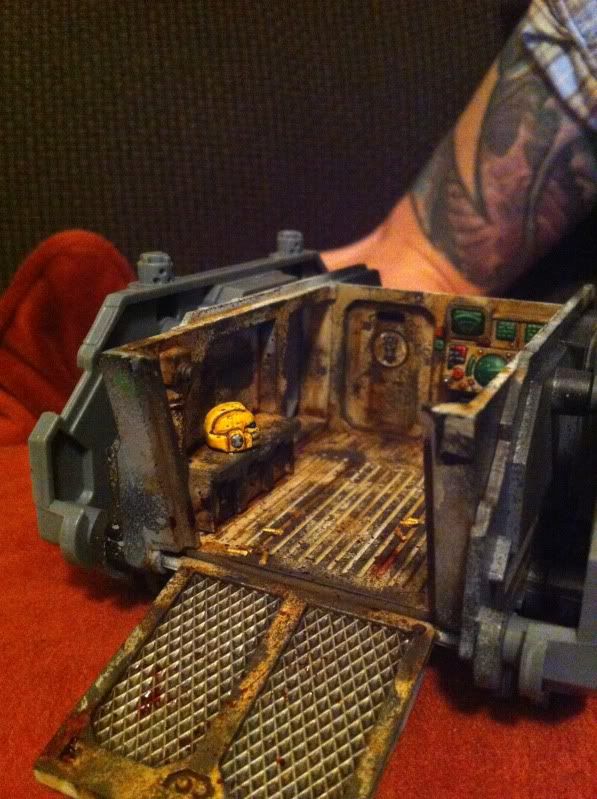
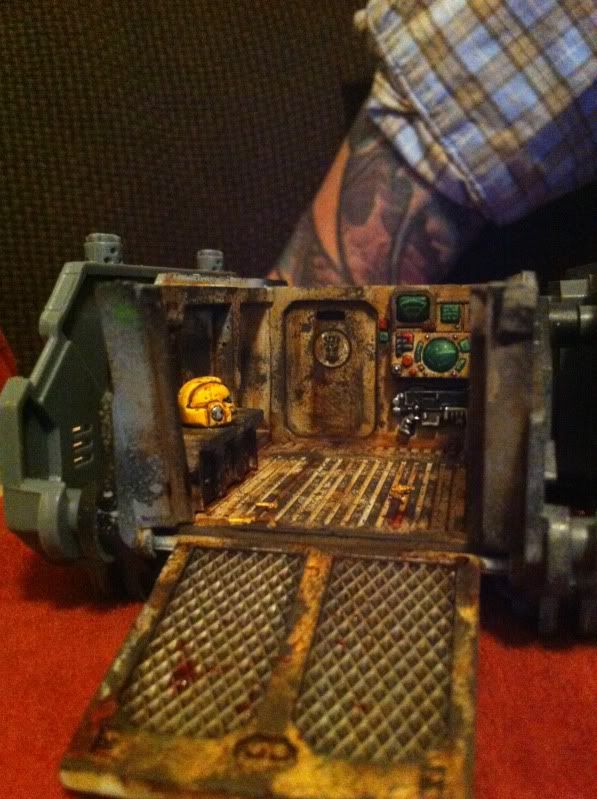
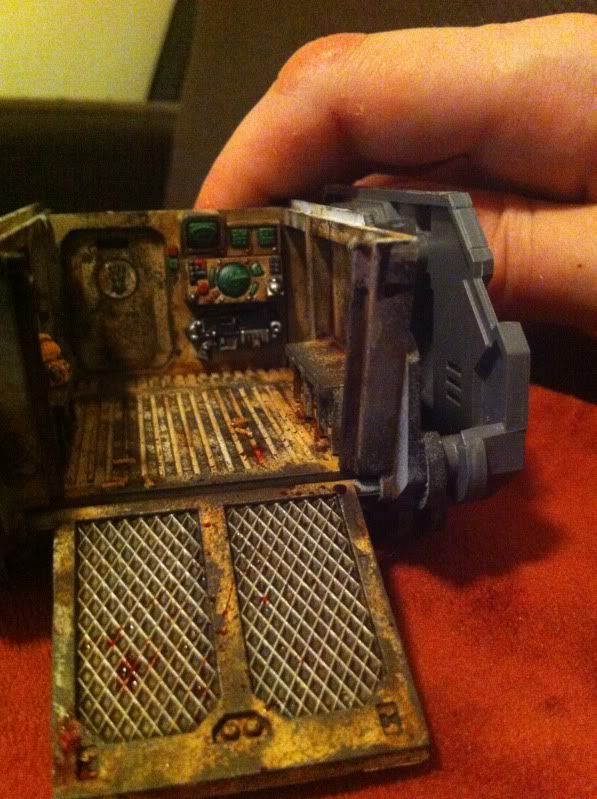
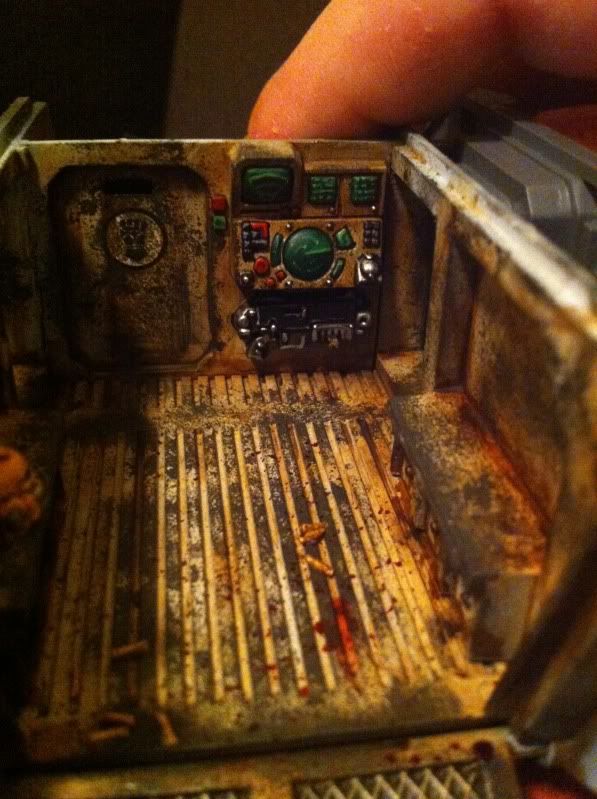
Pretty self explanatory: the interior of a rhino. 

The entire interior was undercoated black and airbrushed fortress gray and white. Sponge chipping was applied using Charadon Granite. For weathering, I used two layers of burnt umber oil paint, the first was a thin layer applied on all surfaces, the second layer was applied more thickly concentrating in the recesses and in areas where I wanted to add build up or streaking. Finally, to add a sense of realism and imply the vehicle's use by its passangers, blood was splashed on sparingly using Tamiya Clear Red mixed with a touch of black and Scorched Brown; Secret Weapon Miniatures spent shell casing were superglued in place; and a hurridly painted helmet was glued down.

Because the interior of the Rhino will be...well...interior...I didn't spend more than a few hours on the effort. This was also my first time using oil paints in a project -- I have barely had time to experment with them before, even -- so it was a learning process but I'm fairly happy with the results, I think.


Saturday, July 7, 2012

More Reposing Marines WIP


brief update here. I've been working on more re-posed marines for my two tactical squads which I want to finish before I do another round of batch painting which should finish my two tactical squads (?!). The results are below. I've added scrimshaw to the squad leaders and sergeants. I've also got pieces of bone and skeletal hands converted to stick onto random marines using the metal fastener-like things from those scroll bits that come with every Space Marine kit ever made but, alas, I have no pictures of those here.


and now to go solve my festering yellow crisis...

Tuesday, April 10, 2012

WIP Experimenting with Oil Paints and Metallic Battle Damage Pt. II

With my first tactical squad almost done (happy happy pictures in the coming weeks), I've started thinking about how to paint armor. I'm told oil paints are a must for good armor and given that I have little experience with painting vehicles or with oil paints, I thought I'd give some more experimentation a go. Here, I was using Imperial Armor Masterclass as a guide. This is basecoat, oil, and chipping only -- no highlights.


This little experiment has convinced me that oil is the way to go. However, it's a finicky medium and its properties change pretty significantly as it slowly dries. That said, a little bit more practice and we'll be good to go.

Sunday, April 1, 2012

WIP Posing Marines

The limited poses of space marines drives me crazy. Mixing in running legs from the assault box can help, but only so much. Having one or two marines posed differently using GW parts also helps (e.g., the kneeling and auspex marines, previously pictured).

But wanting some more variability, I've started messing around with converting marines into different poses. the MK4 marine previously pictured (in an aiming position) was a minor reposing conversion, but it really just moved the bolter up closer to the guy's face -- barely noticeable, really. So decided to go for another converted pose in this squad, something a little more distinct.

Hence, we have 'Mr. walking-with-weapon-in-stand-by-position." First time I've ever tried a serious reposing. My Green Stuff skills need some work, but with a few adjustments, this guy should be good to go.


Saturday, March 31, 2012

Bases, Custom Decals WIP

Recently, I've added new custom decals and settled on a basing method. I haven't had time for any good photographing, so these two quick, fairly crappy shots will have to do.

(Click for larger pictures).


  • Bases: Last post, I had some quick WIP shots of bases with plasticard pipes, scrap and Secret Weapon Miniatures razor wire along with some green stuff. After painting those bits with metallics, washes, oil washes and some weathering powders, I applied two layers of mud using the kit also from by Secret Weapon Miniatures, including some water effects to simulate puddles. I'm really pleased with the results: the muddy terrain with debris gives the sense of assaulting (or defending) entrenched positions and implies some really intense combat -- both of which articulate the Imperial Fists' specialty in siege warfare and stubborn nature. The dark, wet mud also ties together the mud streaks and battle damage on the armor, I think, creating an overall coherent atmosphere. I still have to paint some black around the edges to cover up the sloppy mud applications, but oh well.
  • Decals: I replaced the squad number on the knees with the 5th Company insignia. Now, there is no official background on Companies having their own insignia, but its an effective way to add to the feel of the force, creating a sense of culture and history. The insignia itself is a crenelated tower, similar to the silhouette of a rook chess piece. This seems appropriate for the the Chapter, especially given the Imperial Fists' prominent role in defending the Emperor's Palace during the Horus Heresy. Also, the symbol may have a legitimate claim at canonicity, as it is depicted on an Imperial Fists Terminator in Index Astartes (below). While I may be reaching a bit, notice that the Terminator features black reliefs, perhaps implying that he is attached to 5th Company and that, therefore, the crenelated insignia may be that of 5th Company as well. Also, like, you know, it looks cool.


update: In the movie Ultramarines, V Company is referred to as the "Palace Guard," so if that horribly film is taken as cannon, then the crenelated tower would be an even more appropriate choice for the Company's insignia.  

Sunday, March 25, 2012

Bases WIP

I've finally gotten painting back into the routine and made some respectable progress. But for now, all that I've gotten pictures of is a few bases. The overall idea is to simulate muddy entrenchments. Here, I've completed the first step: using green stuff and glue to fix bits of plasticard and barbed wire to the base. Later, after some painting, I'll apply the mud.

(Click for larger images)